
lakedmb
Well-Known Member
Not sure if this has been posted, but thought it was a great resource to include here.
Soundhound, please let me know if you don't want this posted and I will remove this thread immediately.
The Soundhound Microphone
This is a construction project that will give you a calibration microphone of very high quality. In fact, this microphone is within a dB or so of the flatness of response of an extremely expensive laboratory microphone over most of the audio range to beyond 15kHz, and is only down about 3dB at 20kHz!
All that is needed to make a complete real-time audio analysis system is this microphone, a computer (laptop or desktop) that has a microphone input and line output, and the TrueRTA spectrum analysis program.
The microphone capsule costs less than $2.00 (!) and the supporting parts are few, and very low cost. The microphone element is available from DigiKey Electronics, and all the other parts are available from RadioShack.
I've been using this microphone capsule for over a decade as both a calibration microphone and as a high quality microphone for recording sound effects for feature films. The low cost of this microphone, and it's high quality, made it possible to record some very spectacular sound effects such as taping it to the body of a car which is about to crash, or taping it to a target to record the sound of a bullet zipping toward it. The low cost meant that if the microphone was destroyed, the only loss was a couple of dollars! For spectrum analysis, I carry it with my laptop for easy field analysis of sound systems. In fact, I used it extensively in the construction of a THX certified screening room I constructed for a Hollywood film production company.
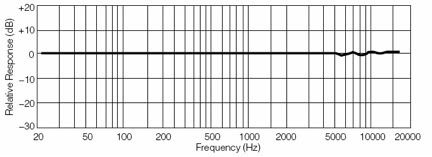
This is the frequency response graph from the microphone's data sheet. It agrees with what I measure in the real world.
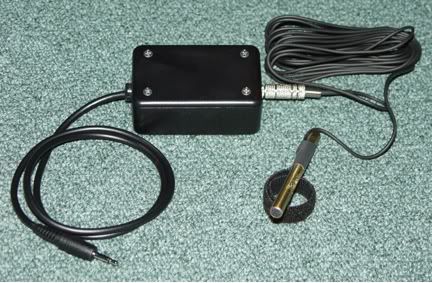
This is a picture of my completed calibration microphone. Note that I added a jack so that I can disconnect the microphone from the battery box and used some cable I had laying around my lab for the wire from the battery box to the microphone capsule.
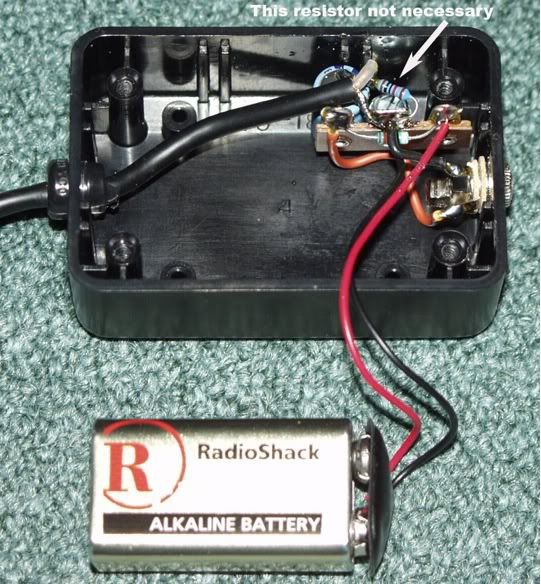
Interior shot of battery box. Note that I added an extra resistor (not necessary) and used a radial lead capacitor instead of the axial lead one recommended.
I also mounted the parts to a terminal strip.
The parts required are as follows:
* Panasonic Microphone Model WM-61A
* Plastic project box
* 9 Volt transistor radio battery (available anywhere)
* 9 Volt battery clip
* 2,200 Ohm ¼ watt resistor
* 10 Microfarad / 10 volt (or greater) electrolytic capacitor
* Cable with 1/8" mini-phone jack attached (buy two of these - one for the cable only)
CONSTRUCTION:
Soundhound, please let me know if you don't want this posted and I will remove this thread immediately.
The Soundhound Microphone
This is a construction project that will give you a calibration microphone of very high quality. In fact, this microphone is within a dB or so of the flatness of response of an extremely expensive laboratory microphone over most of the audio range to beyond 15kHz, and is only down about 3dB at 20kHz!
All that is needed to make a complete real-time audio analysis system is this microphone, a computer (laptop or desktop) that has a microphone input and line output, and the TrueRTA spectrum analysis program.
The microphone capsule costs less than $2.00 (!) and the supporting parts are few, and very low cost. The microphone element is available from DigiKey Electronics, and all the other parts are available from RadioShack.
I've been using this microphone capsule for over a decade as both a calibration microphone and as a high quality microphone for recording sound effects for feature films. The low cost of this microphone, and it's high quality, made it possible to record some very spectacular sound effects such as taping it to the body of a car which is about to crash, or taping it to a target to record the sound of a bullet zipping toward it. The low cost meant that if the microphone was destroyed, the only loss was a couple of dollars! For spectrum analysis, I carry it with my laptop for easy field analysis of sound systems. In fact, I used it extensively in the construction of a THX certified screening room I constructed for a Hollywood film production company.
This is the frequency response graph from the microphone's data sheet. It agrees with what I measure in the real world.
This is a picture of my completed calibration microphone. Note that I added a jack so that I can disconnect the microphone from the battery box and used some cable I had laying around my lab for the wire from the battery box to the microphone capsule.
Interior shot of battery box. Note that I added an extra resistor (not necessary) and used a radial lead capacitor instead of the axial lead one recommended.
I also mounted the parts to a terminal strip.
The parts required are as follows:
* Panasonic Microphone Model WM-61A
* Plastic project box
* 9 Volt transistor radio battery (available anywhere)
* 9 Volt battery clip
* 2,200 Ohm ¼ watt resistor
* 10 Microfarad / 10 volt (or greater) electrolytic capacitor
* Cable with 1/8" mini-phone jack attached (buy two of these - one for the cable only)
CONSTRUCTION:
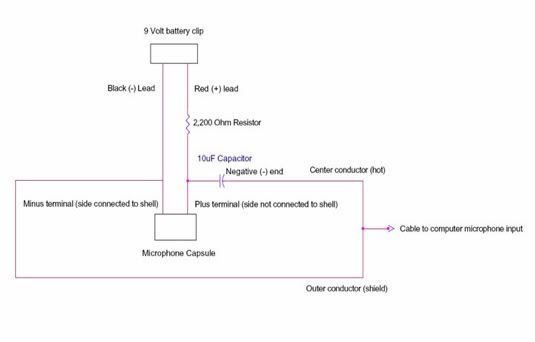
- 1. Start by trimming back the stripped end of one of the shielded cables so that the length is about 1/2". Move the shield wires away and twist them together tightly. Strip about 1/16" of the insulation off the center (hot) conductor. Tin both the end of the shield wire and the tip of the center conductor with solder. Solder the center conductor to the plus (+) side of the microphone element and the shield to the minus (-) side of the microphone element. Avoid applying heat any longer than absolutely necessary to the microphone element's contacts! Cut the jack off the other end of this cable.
NOTE: If you want to install a jack on the battery box like I did so that the microphone can be disconnected, leave the 1/8" plug on the opposite end of this cable. This jack would be the one you would install on the battery box if you wish to go this route. The inner (hot) lead would go to the "tip" connector of the jack, and the shield would go to the tab which is connected to the metal body of the jack.

- 2. Cut the other cable at a point about 2 to 3 feet from the 1/8" plug. Strip the insulation back about 1 1/2". Move the shield wires away and twist them tightly. Strip about ¼" insulation off the center conductor. Strip the free end of the other cable coming from the microphone element in the same manner. NOTE: If you decided to use a jack on the battery box so the microphone element can be disconnected, use a short piece of the scrap wire cut from the cable which goes to the computer and strip both ends, connecting one end to the jack's terminals.
- 3. Drill a small hole in each end of the project box and insert the stripped end of each cable through. Tie a loose knot in each cable inside the box to be used as a strain relief.
- 4. Twist the shield wire from each cable and the black (-) lead from the 9 volt battery clip together and solder. Cover with electrical tape.
- 5. Twist one lead of the 2,200 ohm resistor and the red (+) lead of the 9 volt battery clip together and solder. Cover with electrical tape.
- 6. Twist the other lead from the 2,200 ohm resistor, the plus (+) side of the 10 microfarad capacitor and the inner (hot) conductor from the microphone capsule together and solder. Cover with electrical tape.
- 7. Twist the inner (hot) conductor from the jack end of the cable (the end that goes to your computer) and the negative (-) side of the 10 microfarad capacitor together and solder. Cover with electrical tape.
- 8. Insert a 9 volt battery in the battery clip. Tighten the knots in each cable at the proper length to allow a bit of slack. Insert a bit of soft foam over the components to keep the them from rattling and secure the cover of the box.
- 9. Fashion a "mount" for the microphone capsule. As can be seen from my photo, I made a mount from a length of tubing purchased at a model railroad shop, and placed a 6-32 threaded stud at the opposite end. A suitable cover can also be made from the outer barrel of a "Bic" pen. Make sure that the front of the microphone capsule is at the edge, or slightly above the mounting cylinder to avoid diffraction and resulting irregularities in high frequency response measurement. Secure the capsule within the cylinder with a small amount of glue, being careful to avoid getting the glue on the face of the microphone capsule.
- 10. That's it! Plug the microphone into the microphone input of your computer and make sure everything works OK.